Revive Your Windows 7 Experience with Online Repair Solutions
Need more help and options for repairing Windows 7 online
If you’re having trouble repairing Windows 7 online, there are a few options you can try. First, try booting your computer into Safe Mode by restarting it and pressing the F8 key repeatedly until the Advanced Boot Options menu appears. From there, select Safe Mode and see if you can access Windows.
If that doesn’t work, you can try using the System Restore tool to go back to a previous point in time when your computer was working properly. To do this, go to the Start menu, type “System Restore” in the search bar, and follow the on-screen instructions.
If all else fails, you may need to use a recovery disc or a USB flash drive with Windows 7 installation files to repair your operating system. You can create a recovery disc or USB using the Windows 7 Backup and Restore tool or download one from the Microsoft website.
For more advanced troubleshooting, you can use the Command Prompt to run repair tools or launch startup repair. You can access the Command Prompt by pressing the Windows key + R, typing “cmd” in the Run dialog box, and pressing Enter.
Remember to always back up your important files before attempting any repairs to avoid data loss.
How to use the Startup Repair Tool to fix Windows 7 issues
How to Use the Startup Repair Tool to Fix Windows 7 Issues
1. Start your computer and wait for the Windows 7 logo to appear.
2. Press the F8 key repeatedly until the Advanced Boot Options menu appears.
3. Use the arrow keys to select “Repair Your Computer” and press Enter.
4. Select your language and click “Next.”
5. Enter your username and password, then click “OK.”
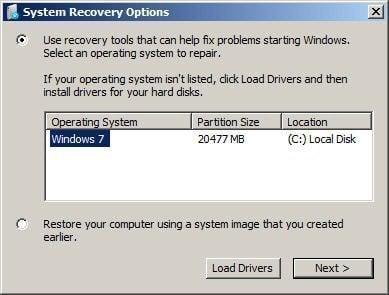
6. In the System Recovery Options menu, click “Startup Repair.”
7. The Startup Repair tool will automatically diagnose and fix any issues preventing Windows 7 from starting.
8. Once the repair process is complete, restart your computer.
9. If the Startup Repair tool cannot fix the issue, you may need to reinstall Windows 7 or seek further technical support.
Remember to always backup your important files before attempting any repairs or installations.
Booting from the Windows 7 DVD for repair
To repair Windows 7 using a DVD, follow these steps:
1. Insert the Windows 7 DVD into your computer’s optical disc drive.
2. Restart your computer and press any key when prompted to boot from the DVD.
3. The computer will start from the DVD and display a Windows logo.
4. Select your language, time, and currency preferences, then click “Next.”
5. Click on “Repair your computer” at the bottom left corner of the screen.
6. Choose the operating system you want to repair (Windows 7) and click “Next.”
7. From the System Recovery Options menu, select “Startup Repair” or any other repair tool you want to use.
8. The tool will attempt to fix any issues it finds. If it cannot repair the problem, it will provide a detailed report.
Remember, if you have Windows Vista or Windows 10, the steps may vary. If you encounter any issues, consult the Microsoft website or contact technical support for further assistance.
Choosing language and settings during Windows 7 repair
When repairing Windows 7 online, you may need to choose language and settings. Follow these steps:
1. Start your computer and wait for it to enter recovery mode automatically.
2. Use the computer keyboard or a game controller to navigate the options on the screen.
3. Select “Launch Startup Repair” from the menu.
4. If the automatic repair tool cannot fix the issue, you may need to manually repair Windows 7.
5. Insert a Windows 7 installation disc or a USB flash drive with the Windows 7 installation files into the optical disc drive or a USB port, respectively.
6. Restart your computer and press any key when prompted to boot from the installation disc or USB flash drive.
7. Follow the on-screen instructions to choose your language and settings.
8. Select “Repair your computer” instead of “Install now”.
9. In the System Recovery Options, choose the appropriate recovery tool to fix the issue, such as Startup Repair or System Restore.
10. Follow the instructions provided by the recovery tool to repair Windows 7.
Using the System Recovery Options to locate and repair Windows 7
Using the System Recovery Options is an effective way to locate and repair Windows 7 issues. Here’s how you can do it:
1. Start by restarting your computer and tapping the F8 key repeatedly until the Advanced Boot Options menu appears.
2. Use the arrow keys on your keyboard to select “Repair Your Computer” and press Enter.
3. Select the language and keyboard input method you prefer, then click “Next.”
4. Enter your username and password, if prompted, and click “OK.”
5. In the System Recovery Options menu, choose “Startup Repair” to automatically fix common issues. If this doesn’t work, try “System Restore” to restore your computer to an earlier point in time.
6. If none of the previous options work, you can access the Command Prompt to use specific repair tools like the bootrec command or chkdsk utility.
7. After completing the necessary repairs, restart your computer and see if the issue is resolved.
Remember, System Recovery Options can also be accessed using a Windows 7 installation disc or a system repair disc.
Selecting the appropriate Windows 7 installation for repair
- Boot your computer and insert the Windows 7 installation disc or USB drive.
- Restart your computer and press any key to boot from the installation media.

- Choose your language preferences and click “Next”.
- Click on “Repair your computer” at the bottom left corner of the installation window.
- Wait for the system recovery options to load.
- Click on “Next” to proceed.

- Select the appropriate Windows 7 installation that requires repair.
Utilizing the Startup Repair Recovery Tool for Windows 7
– If your Windows 7 computer is experiencing issues and you’re unable to access the operating system, the Startup Repair Recovery Tool can help resolve the problem.
– To access the tool, start by inserting your Windows 7 installation disc or a USB drive with the installation files.
– Restart your computer and press any key when prompted to boot from the disc or USB.
– Select your language preferences and click “Next.”
– On the next screen, click “Repair your computer” to access the recovery options.
– Choose “Startup Repair” from the list of options and wait for the tool to analyze and fix any issues it finds.
– If the tool is unable to repair the problem, it will provide you with more information and suggest additional steps to take.
– Remember to remove the installation disc or USB drive before restarting your computer.
For more detailed instructions and troubleshooting tips, visit the Microsoft Windows support website.
Troubleshooting and restarting Windows 7 if the startup repair didn’t work
If the startup repair didn’t work for your Windows 7, you can try troubleshooting and restarting your computer. First, restart your computer and enter the recovery mode by pressing the F8 key repeatedly during startup. From there, choose the “Repair Your Computer” option. If this doesn’t work, you may need to reinstall Windows 7 or consider upgrading to Windows 10.
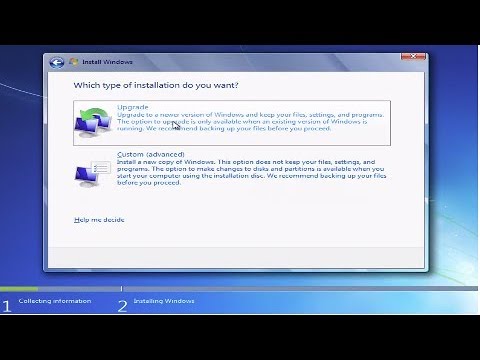
To reinstall Windows 7, insert the installation disc or USB and restart your computer. Follow the on-screen prompts to complete the installation. If you’re upgrading to Windows 10, you can do so online by visiting the Microsoft Windows website. Remember to back up your important files before proceeding with any installation or upgrade.

