Welcome to our article on High Disk and Memory Usage Windows 10 Solutions, where we dive into effective strategies to optimize your computer’s performance. Explore the practical tips and tricks presented here to reclaim precious disk space and enhance memory utilization, ensuring a smoother and more efficient Windows 10 experience.
Understanding Computer Memory
When experiencing high disk and memory usage on Windows 10, it’s important to address the issue promptly. This can lead to slow performance and other frustrating problems. Fortunately, there are simple solutions you can try:
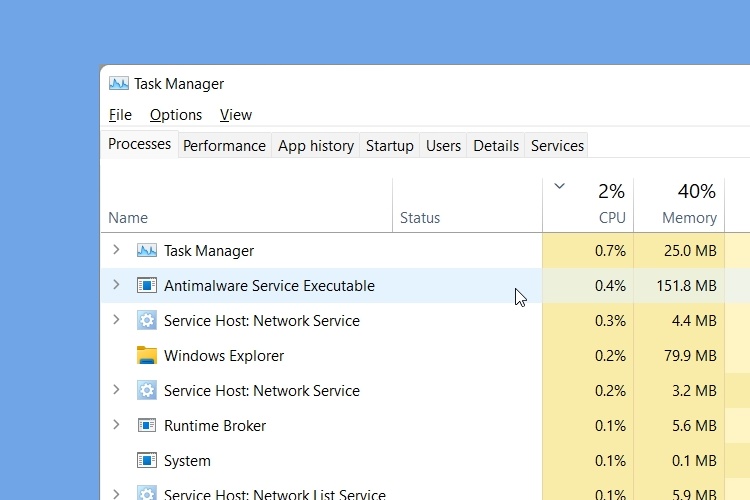
1. Check Task Manager: Press Ctrl+Shift+Esc to open Task Manager. Look for processes consuming a lot of CPU or memory. End any unnecessary or problematic tasks.
2. Update Windows: Keeping your operating system up to date can resolve many usage issues. Visit the Windows Update settings to check for available updates.
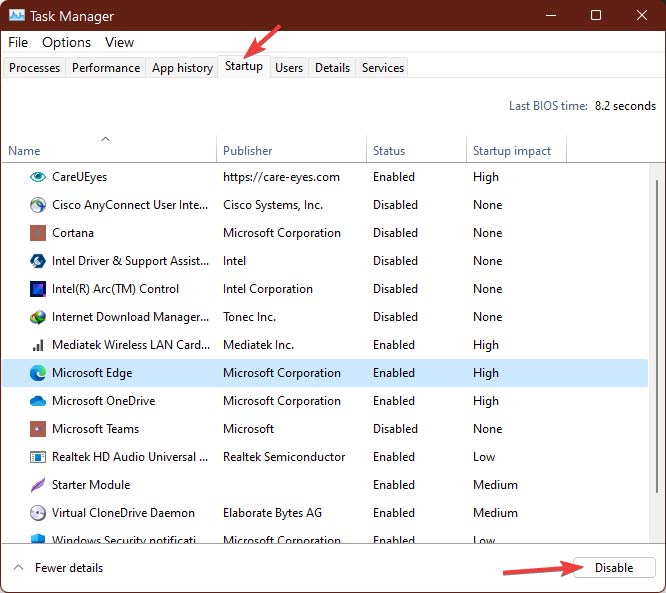
3. Manage Startup Programs: Press Ctrl+Shift+Esc, then click on “Startup” in Task Manager. Disable any unnecessary programs that launch on startup.
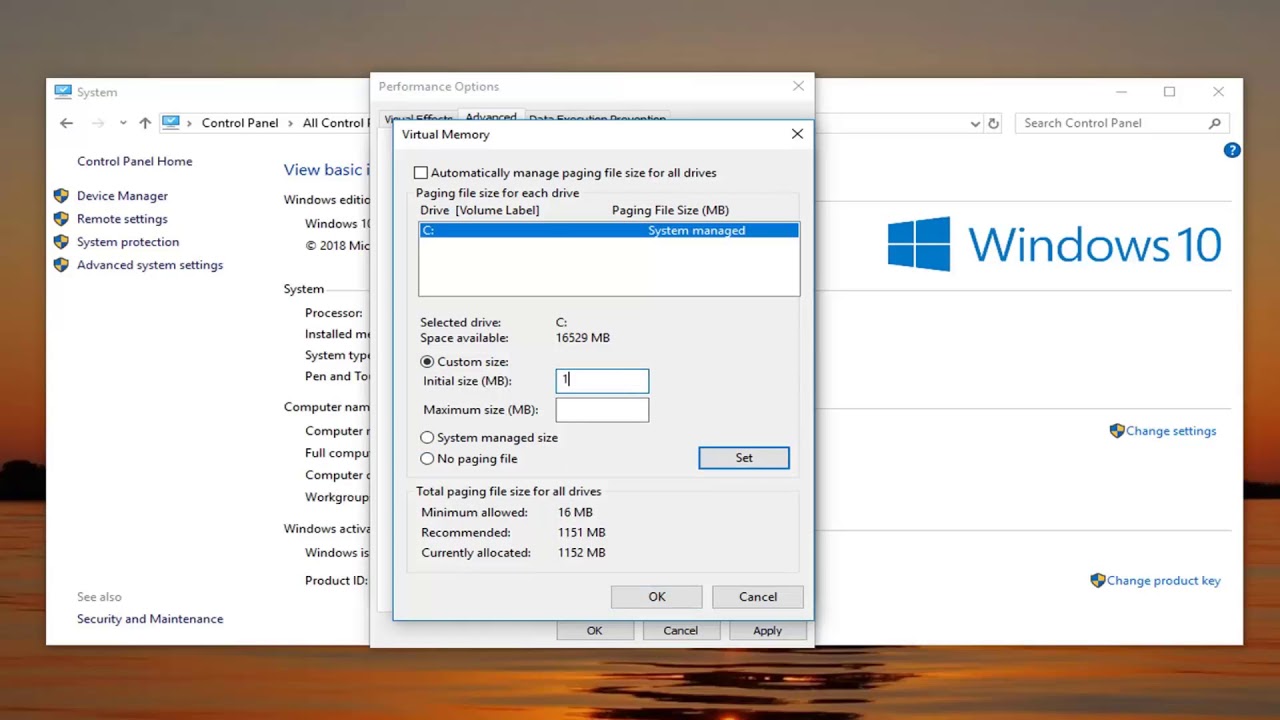
4. Adjust Virtual Memory: Press Win+X and select “System.” Go to “Advanced system settings” and click on the “Settings” button under the “Performance” section. Select the “Advanced” tab and click on “Change” under the “Virtual memory” section. Adjust the settings according to your system’s requirements.
5. Scan for Malware: Run a thorough scan with your preferred antivirus software to eliminate any potential malware causing high usage.
Remember to save your work before attempting any troubleshooting steps. These methods can help alleviate high disk and memory usage problems on Windows 10, improving overall performance.
Checking Memory Usage in Windows 10
To check memory usage in Windows 10, follow these steps:
1. Press Ctrl + Shift + Esc to open the Task Manager.
2. Click on the Performance tab to view CPU and memory usage.
3. Under the Memory section, you can see the amount of RAM currently in use.
4. To identify programs or processes using excessive memory, click on the Processes tab and sort by Memory to see the highest usage.
5. If you notice a particular program or process causing high memory usage, try closing or uninstalling it to free up memory.
6. Additionally, you can check for memory leaks or other issues by monitoring the Memory tab over time to see if usage consistently increases.
7. Restarting your computer can also help clear out any temporary memory usage problems.
8. If the issue persists, consider upgrading your RAM or seeking further technical assistance.
Fixing High Memory Usage in Windows 10
1. Check Task Manager: Open Task Manager by right-clicking on the taskbar and selecting “Task Manager.” Look for any programs or processes using a lot of memory under the “Processes” or “Details” tab.
2. Disable Startup Programs: Press “Ctrl + Shift + Esc” to open Task Manager. Go to the “Startup” tab and disable any unnecessary programs that start with your computer.
3. Update Drivers: Outdated or incompatible drivers can cause high memory usage. Visit the manufacturer’s website and download the latest drivers for your hardware.
4. Adjust Visual Effects: Right-click on the Start button and select “System.” Go to “Advanced system settings” and under the “Performance” section, click on “Settings.” Choose “Adjust for best performance” or customize the visual effects to optimize performance.
5. Scan for Malware: Use Windows Defender or a trusted antivirus program to scan for malware that may be causing high memory usage.
6. Increase Virtual Memory: Press “Win + R” and type “sysdm.cpl” to open System Properties. Go to the “Advanced” tab, click on “Settings” under the “Performance” section, and then go to the “Advanced” tab again. Under the “Virtual memory” section, click on “Change” and increase the size of the paging file.
7. Disable Superfetch and Windows Search: Press “Win + R” and type “services.msc” to open the Services Manager. Locate “Superfetch” and “Windows Search” services, right-click on each one, and select “Properties.” Set the startup type to “Disabled” for both services.
Remember to always restart your computer after making any changes. These steps should help resolve high memory usage issues in Windows 10.
python

import psutil
def get_disk_usage():
total, used, free, percent = psutil.disk_usage('/')
print(f"Total Disk Space: {total/(1024**3):.2f} GB")
print(f"Used Disk Space: {used/(1024**3):.2f} GB")
print(f"Free Disk Space: {free/(1024**3):.2f} GB")
print(f"Disk Usage: {percent}%")
def get_memory_usage():
mem = psutil.virtual_memory()
print(f"Total Memory: {mem.total/(1024**3):.2f} GB")
print(f"Available Memory: {mem.available/(1024**3):.2f} GB")
print(f"Used Memory: {mem.used/(1024**3):.2f} GB")
print(f"Memory Usage: {mem.percent}%")
# Usage
get_disk_usage()
get_memory_usage()
Note: The above code uses the `psutil` library, which is not a built-in Python module. You can install it by running `pip install psutil` in your Python environment. This library allows you to retrieve system information, including disk and memory usage, in a platform-independent manner.
Closing Unnecessary Programs
To close unnecessary programs and reduce high disk and memory usage on Windows 10, follow these steps:
1. Open the Task Manager by right-clicking on the taskbar and selecting “Task Manager.”
2. In the Task Manager window, go to the “Processes” tab.
3. Sort the processes by “CPU” or “Memory” to identify the programs consuming the most resources.
4. Right-click on the unnecessary programs and select “End Task” to close them.
5. If a program is unresponsive, click on the program name and then click on the “End Task” button.
6. Consider disabling startup programs that are not needed. To do this, go to the “Startup” tab in the Task Manager and disable any unwanted programs.
7. Restart your computer to apply the changes.
Closing unnecessary programs can help improve your computer’s performance by freeing up memory and reducing disk usage.
Disabling Startup Programs
- Open Task Manager by pressing Ctrl+Shift+Esc
- Click on the Startup tab at the top of the Task Manager window
- Review the list of programs that are set to start automatically when Windows starts
- Select the program you want to disable from the list
- Click on the Disable button at the bottom right corner of the Task Manager window
- Repeat steps 4 and 5 for any other unwanted startup programs
- Close the Task Manager window
- Restart your computer to apply the changes
Disabling Superfetch Service
To disable the Superfetch service on Windows 10 and resolve high disk and memory usage issues, follow these steps:
1. Press the Windows key + R to open the Run dialog box.
2. Type “services.msc” and press Enter to open the Services window.
3. Scroll down and locate the “Superfetch” service.
4. Right-click on the Superfetch service and select “Properties.”
5. In the Properties window, go to the “General” tab.
6. Change the “Startup type” to “Disabled.”
7. Click on “Apply” and then “OK” to save the changes.
8. Restart your PC for the changes to take effect.
Disabling Superfetch can help reduce unnecessary disk and memory usage, especially if you’re experiencing performance issues. Keep in mind that this service is designed to improve system responsiveness, so only disable it if you’re facing persistent high resource usage.
Note: These instructions are specific to Windows 10 and may not apply to other versions of Windows.
If you continue to experience high disk and memory usage, consider exploring other troubleshooting steps or seeking further assistance.
Increasing Virtual Memory
1. Press the Windows key + Pause/Break to open the System window.
2. Click on “Advanced system settings” on the left sidebar.
3. In the System Properties window, click on the “Settings” button under the Performance section.
4. Go to the “Advanced” tab and click on the “Change” button under the Virtual Memory section.
5. Uncheck the “Automatically manage paging file size for all drives” option.
6. Select the drive where Windows is installed and click on the “Custom size” radio button.
7. Enter a higher value in the “Initial size” and “Maximum size” fields (recommended: 1.5 times your RAM size).
8. Click on the “Set” button, then click “OK” to save the changes.
9. Restart your computer for the changes to take effect.
Increasing virtual memory can help alleviate high disk and memory usage problems, especially when running resource-intensive tasks or playing games. By following these steps, users can manually adjust the virtual memory settings to provide additional memory space for their PC, reducing the strain on the physical RAM and improving overall performance.
Implementing Registry Hacks
1. Open the Registry Editor by pressing Windows key + R, then type “regedit” and hit Enter.
2. Navigate to the following key: HKEY_LOCAL_MACHINESYSTEMCurrentControlSetControlSession ManagerMemory Management
3. Create a new DWORD value called “ClearPageFileAtShutdown” and set its value to 1.
4. Next, locate the key: HKEY_LOCAL_MACHINESYSTEMCurrentControlSetServicesNdu
5. Change the “Start” value to 4 to disable the Ndu service.
6. Lastly, find the key: HKEY_LOCAL_MACHINESOFTWAREMicrosoftWindows NTCurrentVersionMultimediaSystemProfile
7. Create a new DWORD value called “SystemResponsiveness” and set its value to 1.
After implementing these registry hacks, restart your computer for the changes to take effect. This should help improve disk and memory usage, and resolve any related performance issues you may be experiencing.
Defragmenting Hard Drives
To defragment your hard drives and improve performance:
1. Open the Disk Defragmenter tool by typing “defragment” in the Windows search bar and selecting the “Defragment and Optimize Drives” option.
2. Select the hard drive you want to defragment and click “Optimize”.
3. Wait for the process to complete. This may take some time depending on the size of your drive and the level of fragmentation.
4. Once finished, close the Defragment and Optimize Drives window.
Defragmenting your hard drives can help organize fragmented files, improving access times and overall system performance. It’s especially beneficial for older systems or those with a high disk usage problem.
Remember to regularly defragment your hard drives to maintain optimal performance.
Troubleshooting Software Problems
Troubleshooting High Disk and Memory Usage in Windows 10
1. Check for Malware: Run a full system scan using your antivirus software to detect and remove any potential threats that may be causing high disk and memory usage.
2. Disable Startup Programs: Open the Task Manager (Ctrl+Shift+Esc), go to the “Startup” tab, and disable any unnecessary programs from launching at startup. This can help reduce the workload on your system and improve performance.
3. Adjust Virtual Memory: Open the Control Panel, search for “System,” select “Advanced system settings,” go to the “Advanced” tab, and click on “Settings” under the Performance section. Then, go to the “Advanced” tab again and click on “Change” under Virtual Memory. Select “Custom size” and set both the Initial and Maximum size to the recommended value displayed or a higher value if necessary.
4. Update Drivers: Outdated or faulty drivers can cause high disk and memory usage. Visit the manufacturer’s website for your hardware components (e.g., graphics card, network adapter) and download the latest drivers.
5. Disable Superfetch and Prefetch: Open the Command Prompt as an administrator and type “net.exe stop superfetch” to disable the Superfetch service. Then, type “net.exe stop sysmain” to disable the Prefetch service. These services can sometimes cause high disk usage.
6. Disable Windows Search: Open the Services window by pressing Windows key + R, typing “services.msc” and hitting Enter. Locate the “Windows Search” service, right-click on it, and select “Properties.” Change the Startup type to “Disabled,” click “Apply,” and then “OK.”
Remember to restart your computer after implementing any changes to see if the high disk and memory usage problem has been resolved.
Dealing with Viruses or Antivirus Issues
If you’re experiencing high disk and memory usage issues on Windows 10, there are a few solutions you can try. First, check your Task Manager to identify any processes or applications that are using a significant amount of resources. Once you’ve identified the culprit, you can take specific steps to address the issue.
One common cause of high disk usage is malware or viruses. Run a full scan with a reliable antivirus program to detect and remove any threats. You can also try using Windows Defender, which is built into Windows 10 and provides real-time protection against malware.
If your disk usage is still high, you can try disabling certain background processes or services that may be consuming excessive resources. To do this, press Ctrl+Shift+Esc to open Task Manager, go to the “Processes” tab, and end any unnecessary processes.
Another potential solution is to adjust the virtual memory settings. Right-click on “This PC” or “My Computer” and select “Properties.” Go to the “Advanced system settings” and under the “Performance” section, click on “Settings.” In the “Performance Options” window, go to the “Advanced” tab and click on “Change” under the “Virtual memory” section. Select “System managed size” or specify a custom size based on your needs.
By following these steps and optimizing your system, you should be able to reduce disk and memory usage on Windows 10.
Adjusting for Best Performance
1. Check CPU Usage: Press Ctrl+Shift+Esc to open Task Manager. Under the Processes tab, identify any processes consuming high CPU resources. Right-click on the process and select “End Task” to free up CPU usage.
2. Optimize Virtual Memory: Press Windows Key + X, then select “System.” Go to “Advanced system settings” and click on the “Settings” button under the Performance section. In the Performance Options window, go to the “Advanced” tab and click on “Change” under Virtual Memory. Uncheck “Automatically manage paging file size for all drives” and select “Custom size.” Set the Initial size and Maximum size to the recommended values listed below, then click “Set” and “OK”:
– For 4GB RAM or less: Initial Size: 4096 MB, Maximum Size: 8192 MB
– For 8GB RAM or more: Initial Size: 8192 MB, Maximum Size: 16384 MB
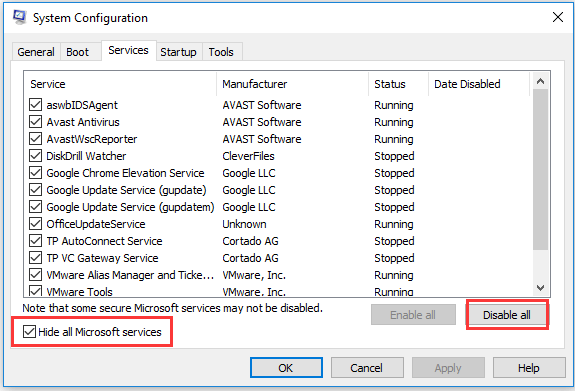
3. Disable Startup Programs: Press Windows Key + R, then type “msconfig” and press Enter. In the System Configuration window, go to the “Startup” tab and uncheck any unnecessary programs that automatically start with your computer. Click “Apply” and “OK.”
4. Adjust Power Settings: Press Windows Key + X, then select “Power Options.” Choose the “High performance” power plan to optimize your computer’s performance.
5. Consider Upgrading Hardware: If the above methods don’t resolve the high disk and memory usage issues, it may be worth considering upgrading your computer’s hardware, such as adding more RAM or replacing the hard disk with a solid-state drive (SSD).
Remember to restart your computer after applying any changes and monitor the performance to see if the adjustments have improved the disk and memory usage.
Additional Tips to Avoid High Memory Usage
- Optimize startup programs: Disable unnecessary applications from launching at startup to reduce memory usage.
- Manage background processes: Use Task Manager to identify and close resource-intensive processes running in the background.
- Update device drivers: Ensure all your drivers are up to date to avoid compatibility issues and improve memory management.
- Scan for malware: Run a reliable antivirus scan to detect and remove any malicious software consuming memory resources.
- Adjust virtual memory settings: Increase or decrease the virtual memory allocation to optimize system performance.
- Disable visual effects: Turn off unnecessary visual effects and animations to free up memory usage.
- Uninstall unnecessary programs: Remove unused software to reduce the overall memory load on your system.
- Clear temporary files: Regularly clean temporary files, cache, and other unnecessary data to free up memory space.
- Upgrade hardware: Consider upgrading your RAM or switching to a solid-state drive (SSD) for improved memory performance.
- Optimize power settings: Adjust power options to prioritize performance over energy savings, which can help reduce memory usage.
